|
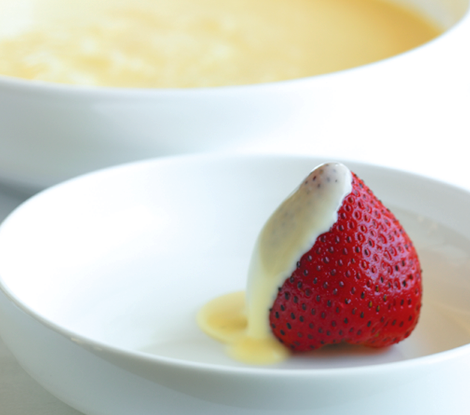
Crème anglaise
(may be refrigerated for up to 2 days.) • 6 large egg yolks • 3 cup granulated sugar • 1 cup whole milk • 1 cup double cream • 1 to 2 vanilla pods, split lengthwise |
|
Place the egg yolks and sugar in a medium mixing bowl. Whisk well to combine thoroughly. Place the milk and cream in a Copper-Core sauce pan. With a paring knife, scrape the seeds from the centre of the vanilla beans. Add them to the liquid along with the bean. Place the pot over medium heat and bring to a boil. Meanwhile, prepare an ice bath. Place a bowl at least 1 litre in capacity, into the ice bath and position a fine mesh strainer over the bowl. When the liquid is at a boil, whisk it into the yolk mixture working the whisk in a figure eight. Remove the vanilla beans, scrape the beans again with a paring knife, and add any additional scrapings to the milk mixture. Reserve the beans for another purpose or discard. Return the mixture to the pot and place over medium heat, stirring constantly and scraping the bottom and sides often with a spoon or spatula. Cook for about 3 minutes total or until the custard has thickened enough to coat a spoon and steam begins to rise from the surface. Pour the sauce through a fine mesh strainer into the bowl. Once the sauce is cooled, refrigerate in an airtight container for up to two days.
The recipe make about 3 cups crème anglaise or an ice cream base.
"To make ice cream, be sure the base is completely cold and then freeze according to the manufacturers instructions on your ice cream machine and store well wrapped in the freezer. The ice cream is best eaten within two days."
The recipe make about 3 cups crème anglaise or an ice cream base.
"To make ice cream, be sure the base is completely cold and then freeze according to the manufacturers instructions on your ice cream machine and store well wrapped in the freezer. The ice cream is best eaten within two days."
|
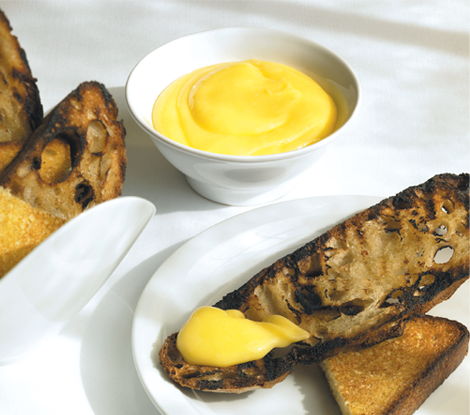
Lemon Curd
Spoon the lemon into tartlet or meringue shells, use as a filling in cakes or crepes, or spoon it over pancakes. "Lemon curd keeps well and can be used in a multitude of desserts." 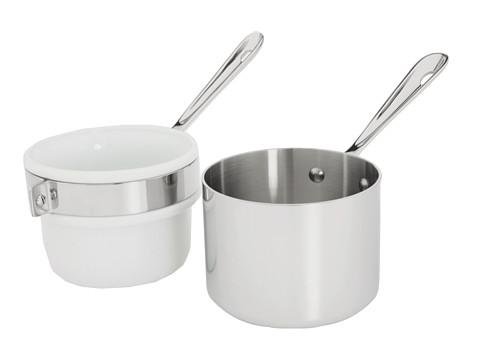
|
|
• 9 tablespoons (4 1/2 ounces) unsalted butter
• 1/2 cup plus 2 tablespoons granulated sugar
• Grated zest of 1 lemon (about 1 teaspoon)
• 2/3 cup fresh lemon juice (from about 4 to 5 lemons)
• 4 large eggs, lightly beaten
Pour water into a Copper-Core 2 qt. Sauce Pan and bring to a simmer over medium-high heat. Put the porcelain double boiler insert into the sauce pan and add the butter. Once the butter has melted, add the sugar, whisking to dissolve it, then add the zest and juice, and heat until the mixture is warm, but not simmering.
Whisk in the eggs and continue to whisk for 4 to 5 minutes or until the curd has thickened. You should be able to see the trail of the whisk through the curd. Strain the curd through a fine-mesh strainer into a bowl. Let cool for a few minutes, then cover with cling film pressed directly against the curd and refrigerate until ready to use. The curd can be refrigerated for up to 2 weeks.
Makes 2 cups.
If they are available, use Meyer lemons. Although it is strained out of the cooked curd, the zest adds another layer of lemon flavour.
"Golden Delicious Apples are a favorite of mine. Be patient, letting the sugar, butter and apple juices caramelise slowly, allowing the flavours and rich caramel colour to develop. Finally, let the tarte rest for a few minutes before unmolding to allow the apples to absorb any remaining caramel in the pan."
Pâte Brisée:
• 1 1/2 cups plain flour, sifted, plus more for dusting
• 3/4 teaspoon Coarse salt
• 12 tablespoons(6 oz.) cold butter, cut into small pieces
• About 3 tablespoons ice water
Apples:
• 1/2 cup granulated sugar
• 1 tablespoon (1/2 ounce) butter, cut into small pieces
• 9 Golden Delicious apples (about 5 pounds)
• Pinch of cinnamon, nutmeg, freshly ground black pepper, optional
Sugared Almond Whipped Cream:
• 1/2 cup Sugared Almonds (see recipe below)
• 3/4 cup double cream
• 2 tablespoons granulated sugar
Place a rack in the centre of the oven and preheat to 375°F. For the pâte brisée, place the flour and salt in a food processor fitted with the metal blade, top with the butter. Pulse the machine to begin to incorporate the butter and flour and then run the machine until the butter and flour are evenly incorporated and no large pieces of butter are visible. With the machine running, drizzle in the ice water until the dough begins to come together.
Dust the work surface, where you will work with the dough, lightly with flour. Remove the dough from the food processor and bring it together using the heel of your hand. Do not over-knead the dough. Shape the dough into a 6-inch disc and refrigerate for at least 30 minutes to firm. Place a 12-inch square piece of cling film on the counter. Centre the dough on the film and roll the dough into a round that is approximately 10 1/2-inches in diameter and 3/8-inch thick. Place the cling film with the dough on a baking sheet. Invert the brasier over the dough and cut around the edge to form a 10-inch disk of dough. Remove the excess dough, cover the round with another piece of cling film and refrigerate for up to a day.
For the apples, spread the sugar in an even layer onto the bottom of the petite brasier. Distribute the butter over the sugar.
Peel the apples, and cut them lengthwise in half. Use a melon baller to remove the seeds. Cut away any remaining skin and stem. Stand the apples around the perimeter of the pan, all facing the same direction, to form a snug circle. You will probably be able to fit about 13 apple halves in the circle. Stand another 2 or 3 apple halves in the center of the pan. Take the remaining apple halves and place them over the center of the apples, cut side down. As the apples cook, they will shrink in size and make additional room in the tarte for these pieces to fit in.
Place the pan over medium heat. The sugar and butter will melt and combine with juices from the apple. Once this takes place, the heat can be increased to medium high. There will be a substantial amount of liquid in the pan and it will bubble up around the apples. Move the pan from time to time and carefully rotate the apples as a whole unit to keep them from sticking to the bottom of the pan. As the apples cook and shrink, making more room in the pan, fit in the pieces of apple that are resting on top. After about 15 minutes, sprinkle the tops of the apples with cinnamon, nutmeg and black pepper if desired.
Be patient as the liquid reduces and forms the caramel. It should take at least 30 minutes and depending upon the heat, it could take longer. The caramel will not darken once it is in the oven, so it is crucial that it reduces to a rich brown colour, however be careful not to burn it.
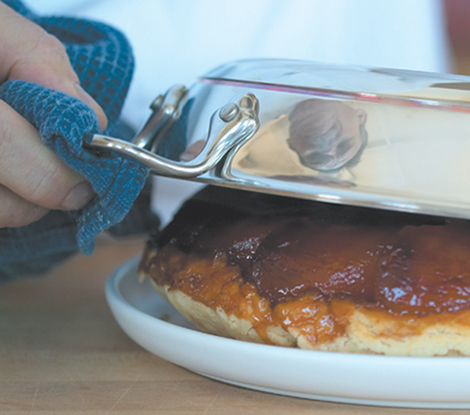
Remove the pan from the heat and place on a baking sheet. Remove the dough from the refrigerator and remove the top layer of film. Prick the top of the dough several times with a fork or pastry docker. Invert the dough over the pan. Remove the remaining cling film. Using a small spatula or knife, tuck the dough around the apples so that the dough fits within the pan.
Place in the oven and bake for about 50 to 55 minutes, or until the dough is cooked a rich golden brown. Remove the tarte from the oven and let it sit for about 10 minutes. Carefully invert a flat serving platter over the tarte and then flip the pan and platter over to unmold the tarte. If you are planning on reheating the tarte, be sure that the platter is oven-proof. Let the brasier sit over the platter for a minute to allow the apples to release. Remove the brasier. If any apples have shifted on the crust or remained in the pan, they can be rearranged or removed from the pan and set into place on the tarte. Use a small offset spatula to smooth the top and sides of the tarte and bring the apples to the edges of the dough, if necessary. The tarte is best eaten the same day it is made.
To serve, preheat the oven to 325°F. Place the tarte into the oven to reheat for about 5 minutes or until warm.
Meanwhile, for the whipped cream, crush the sugared almonds in a mortar with a pestle until finely ground. Whip the cream in a bowl set over an ice bath. When the cream holds its shape, whisk in half the almonds and set the remaining almonds aside.
Cut the tarte and place a wedge on each serving plate. Place a quenelle or dollop of the whipped cream to the side of each slice. Sprinkle the tarte and plate with the remaining almonds.
Serves 8
Sugared Almonds
Resist the temptation to drain these almonds on paper towels immediately after frying. They will stick to the paper towels.
• 1/2 cup slivered almonds
• Canola oil
• Powdered sugar, in a shaker or small strainer
Bring a small Copper-Core sauce pan of water to a boil. Place 1/2 inch of oil in a small sauté pan and bring the oil to 350°F. Place a baking sheet or tray near the oil. Dust the sides and bottom of a medium sized metal bowl with a generous coating of powdered sugar.
When the water is boiling, add the almonds and blanch for 10 seconds. Drain in a strainer and shake well to remove all excess water. Place the hot nuts in the bowl of sugar. Dust the top of the nuts with more sugar and swirl the pan to coat the nuts. Add another one or two dustings of sugar. Although the sugar will melt from the heat of the nuts, they should be visibly coated.
Depending on the size of the pan you are using, you may want to cook half the almonds at a time. Place the nuts in a skimmer or spider and carefully lower them into the hot oil, then pull them out, repeat once or twice to evaporate any water, which may cause the oil to spurt.
Move the almonds in the oil to brown evenly, then remove them with a skimmer or spider to drain, spreading them out on the baking sheet. Once cool, quickly drain the nuts on paper towels to remove any excess oil. Store the sugared almonds in an airtight container.
Makes a 1/2 cup
• 1 1/2 cups plain flour, sifted, plus more for dusting
• 3/4 teaspoon Coarse salt
• 12 tablespoons(6 oz.) cold butter, cut into small pieces
• About 3 tablespoons ice water
Apples:
• 1/2 cup granulated sugar
• 1 tablespoon (1/2 ounce) butter, cut into small pieces
• 9 Golden Delicious apples (about 5 pounds)
• Pinch of cinnamon, nutmeg, freshly ground black pepper, optional
Sugared Almond Whipped Cream:
• 1/2 cup Sugared Almonds (see recipe below)
• 3/4 cup double cream
• 2 tablespoons granulated sugar
Place a rack in the centre of the oven and preheat to 375°F. For the pâte brisée, place the flour and salt in a food processor fitted with the metal blade, top with the butter. Pulse the machine to begin to incorporate the butter and flour and then run the machine until the butter and flour are evenly incorporated and no large pieces of butter are visible. With the machine running, drizzle in the ice water until the dough begins to come together.
Dust the work surface, where you will work with the dough, lightly with flour. Remove the dough from the food processor and bring it together using the heel of your hand. Do not over-knead the dough. Shape the dough into a 6-inch disc and refrigerate for at least 30 minutes to firm. Place a 12-inch square piece of cling film on the counter. Centre the dough on the film and roll the dough into a round that is approximately 10 1/2-inches in diameter and 3/8-inch thick. Place the cling film with the dough on a baking sheet. Invert the brasier over the dough and cut around the edge to form a 10-inch disk of dough. Remove the excess dough, cover the round with another piece of cling film and refrigerate for up to a day.
For the apples, spread the sugar in an even layer onto the bottom of the petite brasier. Distribute the butter over the sugar.
Peel the apples, and cut them lengthwise in half. Use a melon baller to remove the seeds. Cut away any remaining skin and stem. Stand the apples around the perimeter of the pan, all facing the same direction, to form a snug circle. You will probably be able to fit about 13 apple halves in the circle. Stand another 2 or 3 apple halves in the center of the pan. Take the remaining apple halves and place them over the center of the apples, cut side down. As the apples cook, they will shrink in size and make additional room in the tarte for these pieces to fit in.
Place the pan over medium heat. The sugar and butter will melt and combine with juices from the apple. Once this takes place, the heat can be increased to medium high. There will be a substantial amount of liquid in the pan and it will bubble up around the apples. Move the pan from time to time and carefully rotate the apples as a whole unit to keep them from sticking to the bottom of the pan. As the apples cook and shrink, making more room in the pan, fit in the pieces of apple that are resting on top. After about 15 minutes, sprinkle the tops of the apples with cinnamon, nutmeg and black pepper if desired.
Be patient as the liquid reduces and forms the caramel. It should take at least 30 minutes and depending upon the heat, it could take longer. The caramel will not darken once it is in the oven, so it is crucial that it reduces to a rich brown colour, however be careful not to burn it.
Remove the pan from the heat and place on a baking sheet. Remove the dough from the refrigerator and remove the top layer of film. Prick the top of the dough several times with a fork or pastry docker. Invert the dough over the pan. Remove the remaining cling film. Using a small spatula or knife, tuck the dough around the apples so that the dough fits within the pan.
Place in the oven and bake for about 50 to 55 minutes, or until the dough is cooked a rich golden brown. Remove the tarte from the oven and let it sit for about 10 minutes. Carefully invert a flat serving platter over the tarte and then flip the pan and platter over to unmold the tarte. If you are planning on reheating the tarte, be sure that the platter is oven-proof. Let the brasier sit over the platter for a minute to allow the apples to release. Remove the brasier. If any apples have shifted on the crust or remained in the pan, they can be rearranged or removed from the pan and set into place on the tarte. Use a small offset spatula to smooth the top and sides of the tarte and bring the apples to the edges of the dough, if necessary. The tarte is best eaten the same day it is made.
To serve, preheat the oven to 325°F. Place the tarte into the oven to reheat for about 5 minutes or until warm.
Meanwhile, for the whipped cream, crush the sugared almonds in a mortar with a pestle until finely ground. Whip the cream in a bowl set over an ice bath. When the cream holds its shape, whisk in half the almonds and set the remaining almonds aside.
Cut the tarte and place a wedge on each serving plate. Place a quenelle or dollop of the whipped cream to the side of each slice. Sprinkle the tarte and plate with the remaining almonds.
Serves 8
Sugared Almonds
Resist the temptation to drain these almonds on paper towels immediately after frying. They will stick to the paper towels.
• 1/2 cup slivered almonds
• Canola oil
• Powdered sugar, in a shaker or small strainer
Bring a small Copper-Core sauce pan of water to a boil. Place 1/2 inch of oil in a small sauté pan and bring the oil to 350°F. Place a baking sheet or tray near the oil. Dust the sides and bottom of a medium sized metal bowl with a generous coating of powdered sugar.
When the water is boiling, add the almonds and blanch for 10 seconds. Drain in a strainer and shake well to remove all excess water. Place the hot nuts in the bowl of sugar. Dust the top of the nuts with more sugar and swirl the pan to coat the nuts. Add another one or two dustings of sugar. Although the sugar will melt from the heat of the nuts, they should be visibly coated.
Depending on the size of the pan you are using, you may want to cook half the almonds at a time. Place the nuts in a skimmer or spider and carefully lower them into the hot oil, then pull them out, repeat once or twice to evaporate any water, which may cause the oil to spurt.
Move the almonds in the oil to brown evenly, then remove them with a skimmer or spider to drain, spreading them out on the baking sheet. Once cool, quickly drain the nuts on paper towels to remove any excess oil. Store the sugared almonds in an airtight container.
Makes a 1/2 cup
|
Coconut Whipped Cream
Did you know you can make a decadent, fluffy whipped cream by using a can of full-fat coconut milk? Just chill a can of full-fat coconut milk overnight in the fridge. The next day open the can and scoop out the white cream portion. Now whip the cream and add a touch of sweetener to taste. Not only is it simple to make, but it’s easily the best-tasting whipped cream I’ve tasted. You can use this whipped cream just like regular dairy whipped cream. I like to use it as a garnish for desserts, and it’s also amazing with a bowl of fruit, on top of a fruit crisp, or stirred into Banana Soft Serve. The options are really endless! http://ohsheglows.com/2012/08/30/coconut-whipped-cream-a-step-by-step-photo-tutorial/ |
Baked Pâte à Choux
TOTAL TIME About 1 hour Ingredients
1.Heat oven to 400 and grease a baking sheet with butter. Put the butter and a pinch of salt in a saucepan over high heat; add 1 cup water and bring to a boil. Turn the heat to low and add all the flour at once; stir constantly until the mixture pulls away from the pan and forms a ball, about 30 seconds. Remove the pan from the heat and beat in the eggs one at a time; use an electric mixer if you like, and beat until the mixture is smooth. (At this point, you can cover the dough and refrigerate it for up to two days.)
2.If you’re planning on piping out the dough, scoop it into a pastry bag with a 1/2-inch tip, or a plastic freezer bag with a corner cut off. Pipe the pastry onto the baking sheet, or just use two spoons to form your desired shape. Cream puffs should be circles about 1 inch wide and a little over 1 inch tall; éclairs should be 3-to-4-inch fingers, about 1 inch wide.
3.Bake until the pastries are golden brown, nicely puffed up and sound hollow when you tap on them, about 30 minutes for cream puffs and 40 minutes for éclairs. Use a skewer to prick one or two holes in each one to allow the steam to escape; transfer to a rack and let cool to room temperature.4.To fill the pastries using a pastry bag, poke a hole into the pastry and pipe the filling into it, or cut off the top caps of each pastry, spoon in the filling, and close it up like a sandwich. (Éclairs can be slit open and filled, too.) Serve as is, or drizzle with chocolate sauce.
YIELD 2 to 4 dozen pastries, depending on size
- 8 tablespoons unsalted butter, plus a little more for greasing the baking sheet
- Salt
- 1 cup flour
- 4 eggs
1.Heat oven to 400 and grease a baking sheet with butter. Put the butter and a pinch of salt in a saucepan over high heat; add 1 cup water and bring to a boil. Turn the heat to low and add all the flour at once; stir constantly until the mixture pulls away from the pan and forms a ball, about 30 seconds. Remove the pan from the heat and beat in the eggs one at a time; use an electric mixer if you like, and beat until the mixture is smooth. (At this point, you can cover the dough and refrigerate it for up to two days.)
2.If you’re planning on piping out the dough, scoop it into a pastry bag with a 1/2-inch tip, or a plastic freezer bag with a corner cut off. Pipe the pastry onto the baking sheet, or just use two spoons to form your desired shape. Cream puffs should be circles about 1 inch wide and a little over 1 inch tall; éclairs should be 3-to-4-inch fingers, about 1 inch wide.
3.Bake until the pastries are golden brown, nicely puffed up and sound hollow when you tap on them, about 30 minutes for cream puffs and 40 minutes for éclairs. Use a skewer to prick one or two holes in each one to allow the steam to escape; transfer to a rack and let cool to room temperature.4.To fill the pastries using a pastry bag, poke a hole into the pastry and pipe the filling into it, or cut off the top caps of each pastry, spoon in the filling, and close it up like a sandwich. (Éclairs can be slit open and filled, too.) Serve as is, or drizzle with chocolate sauce.
YIELD 2 to 4 dozen pastries, depending on size
Tarte Tatin by chef Thomas Keller Tarte Tatin is a classic French dessert. Many French cooks have a pan that is designed specifically for making this dish. I find the Copper-Core Petite Brasier the perfect pan for making a Tarte Tatin. It is about 1/2-inch wider than traditional pans and can hold close to 5 pounds of apples.
A perfect Tarte Tatin is unforgettable but its success is in the details. Choose apples that are crisp, it means they have a lower water content and will hold up better to cooking.
A perfect Tarte Tatin is unforgettable but its success is in the details. Choose apples that are crisp, it means they have a lower water content and will hold up better to cooking.